Wednesday, September 2, 2009

Choose the Windows 7 edition that is best for you

Choose the Windows 7 edition that is best for you

Features
Windows 7 Home Premium

Windows 7
Home Premium

Windows 7 Professional

Windows 7
Professional

Windows 7 Ultimate

Windows 7
Ultimate

Make the things you do every day easier with improved desktop navigation.

CheckCheckCheck

Start programs faster and more easily, and quickly find the documents you use most often.

CheckCheckCheck

Make your web experience faster, easier and safer than ever with Internet Explorer 8.

CheckCheckCheck

Watch, pause, rewind, and record TV on your PC.

CheckCheckCheck

Easily create a home network and connect your PCs to a printer with HomeGroup.

CheckCheckCheck

Run many Windows XP productivity programs in Windows XP Mode.


CheckCheck

Connect to company networks easily and more securely with Domain Join.


CheckCheck

In addition to full-system Backup and Restore found in all editions, you can back up to a home or business network.


CheckCheck

Help protect data on your PC and portable storage devices against loss or theft with BitLocker.


Check

Work in the language of your choice and switch between any of 35 languages.


Check

Thursday, August 27, 2009

Open source ISO image burner

Windows

95 / 98 / ME / 2000 / XP / Server 2003 / Vista: Infra Recorder

  1. Download and install Infra Recorder, a free and open source image burning program.

  2. Insert a blank CD in the drive and select Do nothing or Cancel if an autorun dialog pops up.

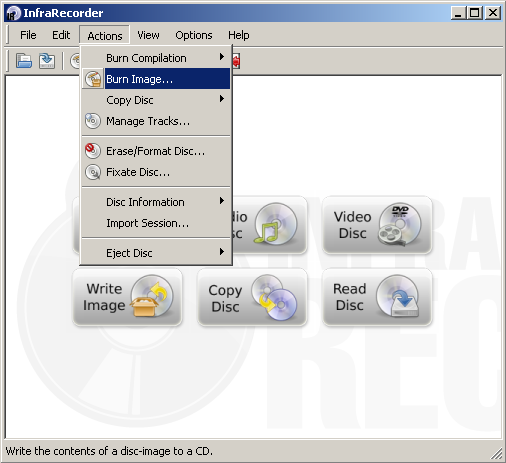
  3. Open Infra Recorder and click the 'Write Image' button in the main screen.
    • Alternatively you can select the 'Actions' menu, then 'Burn image'.
      • infrarecorder3.png

  4. Select the Ubuntu CD image file you want to use, then click 'Open'.
  5. In the dialog, click 'OK'.

XP / Server 2003 / Vista: ISO Recorder

  1. Download and install the appropriate version of ISO Recorder.

  2. Insert an unformatted CD into your burner. (Note: one can burn DVDs with this tool only from Vista.)

  3. Open Windows Explorer, browse to your ISO file, right-click and choose "Next".
    • iso-recorder.gif

Windows 7

  1. Right-click on an ISO image and choose “Burn disc image”.
    • windows7_right.jpg

  2. Select a disk burner (drive) and press "Burn".
    • windows7_burn.jpg

If you check “Verify disc after burning”, it will verify that the ISO image has been burned correctly


Source

Diskmanagement

To start Disk Management:
  1. Log on as administrator or as a member of the Administrators group.
  2. Click Start, click Run, type compmgmt.msc, and then click OK.
  3. In the console tree, click Disk Management. The Disk Management window appears. Your disks and volumes appear in a graphical view and list view. To customize how you view your disks and volumes in the upper and lower panes of the window, point to Top or Bottom on the View menu, and then click the view that you want to use.

How to create a new partition or a new logical drive

To create a new partition or logical drive on a basic disk:
  1. In the Disk Management window, complete one of the following procedures, and then continue to step 2:
    • To create a new partition, right-click unallocated space on the basic disk where you want to create the partition, and then click New Partition.
    • To create a new logical drive in an extended partition, right-click free space on an extended partition where you want to create the logical drive, and then click New Logical Drive.
  2. In the New Partition Wizard, click Next.
  3. Click the type of partition that you want to create (either Primary partition, Extended partition, or Logical drive), and then click Next.
  4. Specify the size of the partition in the Partition size in MB box, and then click Next.
  5. Decide whether to manually assign a drive letter, let the system automatically enumerate the drive, or do not assign a drive letter to the new partition or logical drive, and then click Next.
  6. Specify the formatting options you want to use by using one of the following procedures:
    • If you do not want to format the partition, click Do not format this partition, and then click Next.
    • If you want to format the partition, click Format this partition with the following settings, and then complete the following procedure in the Format dialog box:
      1. Type a name for the volume in the Volume label box. This is an optional step.
      2. Click the file system that you want to use in the File system box.

        You can change the disk allocation unit size, and then specify whether to perform a quick format, or enable file and folder compression on NTFS volumes.
      Click Next.

  7. Confirm that the options that selected are correct, and then click Finish.
The new partition or logical drive is created and appears in the appropriate basic disk in the Disk Management window. If you chose to format the volume in step 6, the format process now starts.

How to format a basic volume

To format a partition, logical drive or basic volume:
  1. In the Disk Management window, right-click the partition or logical drive that you want to format (or reformat), and then click Format.
  2. In the Format dialog box, type a name for the volume in the Volume label box. This is an optional step.
  3. Click the file system that you want to use in the File system box. If you want, you can also change the disk allocation unit size, specify whether you want to perform a quick format, or enable file and folder compression on NTFS volumes.
  4. Click OK.
  5. Click OK when you are prompted to format the volume. The format process starts.

How to view the properties of a basic volume

To view the properties of a partition or logical drive:
  1. In the Disk Management window, right-click the partition or logical drive that you want, and then click Properties.
  2. Click the appropriate tab to view the appropriate property.

How to delete a partition or a logical drive

To delete a partition or logical drive:
  1. In the Disk Management window, right-click the partition or logical drive that you want to delete, and then click Delete Partition or Delete Logical Drive.
  2. Click Yes when you are prompted to delete the partition or logical drive. The partition or logical drive is deleted.
Important
  • When you delete a partition or a logical drive, all the data on that partition or logical drive, and the partition or the logical drive, are deleted.
  • You cannot delete the system partition, boot partition, or a partition that contains the active paging (swap) file.
  • You cannot delete an extended partition unless the extended partition is empty. All logical drives in the extended partition must be deleted before you can delete the extended partition.

Free partitioning tool

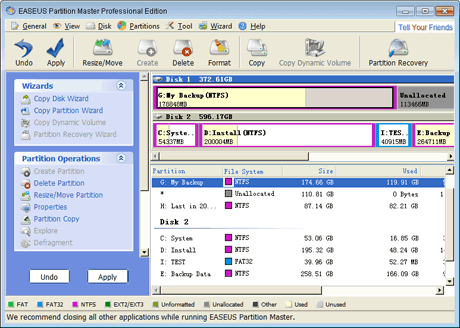
Free partition manager for HOME USER ONLY supports Windows 2000/XP/Vista (only 32 bit). With it you can extend system partition without reboot to optimize the performance of the computer and solve low disk space problems, Create partition for different use, Copy partition to protect our data, and do more basic and advanced partition operations.

Free DownloadDownload


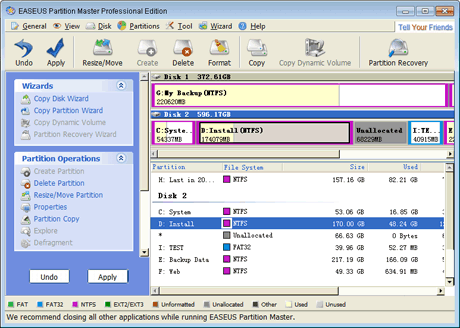
1. Launch EASEUS Partition Master.

EASEUS Partition Master

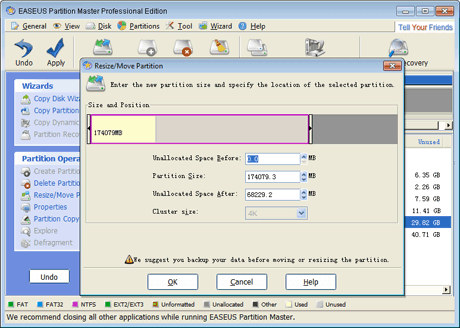
If there is no unallocated space, you can reduce another partition to make unallocated space with "Resize/Move Partition" function.

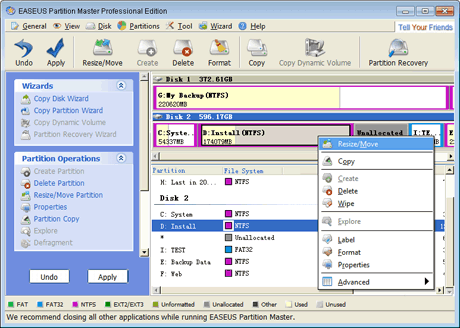
1. Click "Partitions" > "Resize / Move", or choose "Resize / Move" in left "Partition Operations" or right click the mouse.

Choose Partition to Move 1 Choose Partition to Move 2

2. On a disk map, current size of the partition is displayed at the top of the dialog box.

Choose Partition to Move and Resize

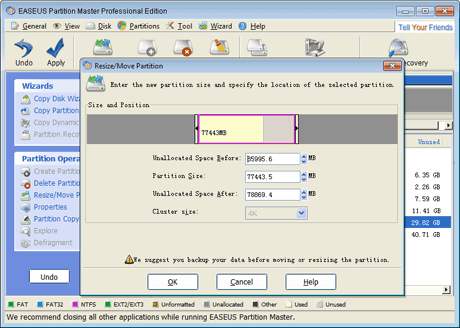
3. Move the mouse to the pane that symbolizes the partition you have selected, when the cursor become a cross crux, drag it front and back, the size of the unallocated space before and after are changed synchronously.

Partition is Moving

Also, inputting the number in the two fields directly can change the position of the partition, and using the corresponding up-down button of the two can make a jiggle.

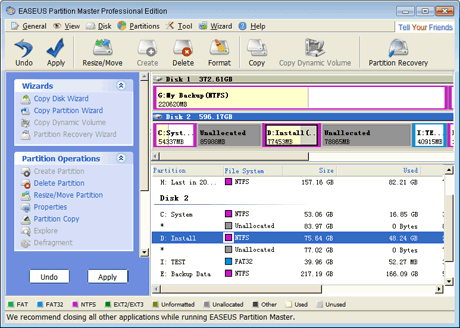
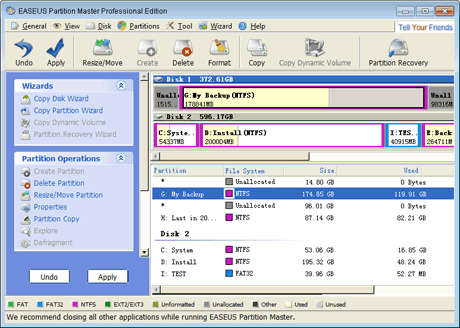
4. After click "OK", partition will be moved to unallocated space. And there is unallocated place to create partition

Partition is Moved

5. Repeat the above steps, you will be able to create partition.

After the new partition is created, click "Apply" to apply all pending operations.

Tips:

1. If the first partition you create in hard disk is logical partition, there will be an unallocated space in the front of it on the disk map. If the first partition is primary partition, there is no unallocated space before.

Create Logical Partition Create Primary Partition

2. You may create 4 primary partitions at most, or create 3 primary partitions and an extended partition.

Booting from cd/dvd

How to Set BIOS to Boot from CDROM:

All modern Computer Systems manufactured in the last years, support boot from cd feature, but it may be required to configure this feature in bios or previous owner of your computer system may have disabled this feature or may have changed the boot priority sequence )

When you start your computer, check the boot-screen for setup key, In most newer pc it will be DELETE key or F2 or F10 so make sure to check it.

1.Change the BIOS boot order so the CD or DVD drive is listed first. Some computers are already configured this way but many are not.

If the CD or DVD drive is not first in the boot order, your PC will start "normally" (i.e. boot from your hard drive) without even looking at what might be in your disc drive.


2. Insert your bootable CD or bootable DVD in your disc drive.
3. Restart your computer.
4. Watch for a Press any key to boot from CD or DVD... message.
5.Your computer should now boot from the CD or DVD disc.

Monday, August 24, 2009

Ubuntu partitioning

Create custom partition for Ubuntu.

You must create at least two partitions
The 'root' partition: Is represented by: /
The 'swap' partition has no representation but is simply as format (usually make atleast double the size of RAM, If u uses more than 1GB of system memory recommended at least the same size of RAM you must need it if you want use hibernation.)

optionally /boot as kernel partition, /home user partition and /tmp for temp folder.


Sunday, December 7, 2008

Generic Host Process for Win32 Services has encountered a problem and needs to close

Symptoms:

  • You are surfing the internet or are engaged any type of Internet activity when suddenly all your Network activity goes to hault. You can still see the Internet connected icon in the tray but you cannot surf, browse or do anything.
  • You get an error message something like “Generic Host Process for Win32 Services has encountered a problem and needs to close. We are sorry for the inconvenience.”
  • Error message reporting about faulting netapi32.dll and svchost.exe.
  • You try to disconnect your Internet because of no activity observed but the Internet icon wont disappear.
  • You recieve an error message something like “Your PC has recovered from a serious problem” etc.


Solution:

Follow these simple steps and your Windows will be fully cured of

Close Port 445:

1. Start Registry Editor (Regedit.exe) by clicking Start menu, and then click the Run icon.
2. In the small box that Opens, type: regedit then click the OK button. The Registry Editor will now have opened.
3. Locate the following key in the
Registry:
HKEY_LOCAL_MACHINE\System\CurrentControlSet\Services\NetBT\Parameters
In the right-hand side of the window find an option called TransportBindName.
Double click that value, and then delete the default value, thus giving it a blank value.

Close Port 135:

1. Then you must now navigate to the following registry key:
HKEY_LOCAL_MACHINE\Software\Microsoft\OLE
2. You will see there is a String Value called: EnableDCOM
Set the value to: N (it should currently be Y)
3. Close the Registry Editor. Shutdown and Restart your computer.

Well that’s all but if you want you can disable NETbios.

What these ports do—->

Port 445 is deeply embedded in Windows and can be difficult or impossible to safely close. While its closure is possible, other dependent services such as DHCP (dynamic host configuration protocol) which is frequently used for automatically obtaining an IP address from the DHCP servers used by many corporations and ISPs, will stop functioning.

The widespread exposure and insecurity of this port has generated a great deal of concern among PC gurus. This has resulted in several approaches to shutting down the Windows DCOM server and firmly closing port 135 once and for all. Although applications may be “DCOM enabled” or “DCOM aware”, very few, if any, are actually dependent upon the presence of its services. Consequently, it is usually possible (and generally desirable if you’re comfortable doing such things) to shut down DCOM and close port 135 without any ill effects. (The fewer things running in a Windows system, the fewer things to suck up RAM and slow everything else down.)